This page is part of archived documentation for openHAB 3.1. Go to the current stable version
# LCN Binding

Local Control Network (LCN) (opens new window) is a building automation system for small and very large installations. It is capable of controlling lights, shutters, access control etc. and can process data from several sensor types. It has been introduced in 1992.
A broad range of glass key panels, displays, remote controls, sensors and in- and outputs exist. The system can handle up to 30,000 bus members, called modules. LCN modules are available for DIN rail and in-wall mounting and feature versatile interfaces. The bus modules and most of the accessories are developed, manufactured and assembled in Germany.
Bus members are inter-connected via a free wire in the standard NYM cable. Wireless components are available, though.

This binding uses TCP/IP to access the LCN bus via the software LCN-PCHK (Windows/Linux) or the DIN rail device LCN-PKE. This means 1 unused LCN-PCHK license or a LCN-PKE is required
# Supported Things
# Thing: LCN Module
Any LCN module that should be controlled or visualized, need to be added to openHAB as a Thing.
LCN modules with firmware versions 120612 (2008) and 170602 (2013) were tested with this binding. No known features/changes that need special handling were added until now (2020). Modules with older and newer firmware should work, too. The module hardware types (e.g. LCN-SH, LCN-HU, LCN-UPP, ...) are compatible to each other and can therefore be handled all in the same way.
Thing Type ID: module
| Name | Description | Type | Required |
|---|---|---|---|
moduleId | The module ID, configured in LCN-PRO | Integer | Yes |
segmentId | The segment ID the module is in (0 if no segments are present) | Integer | Yes |
openHAB's discovery function can be used to add LCN modules automatically. See Discover LCN Modules.
# Bridge: LCN PCK Gateway
PCK is the protocol spoken over TCP/IP with a PCK gateway to communicate with the LCN bus. Examples for PCK gateways are the LCN-PCHK software running on Windows or Linux and the DIN rail mounting device LCN-PKE.
For each LCN bus, interfaced to openHAB, a PCK gateway needs to be added to openHAB as a Thing.
Several PCK gateways can be added to openHAB to control multiple LCN busses in distinct locations.
The minimum recommended version is LCN-PCHK 2.8 (older versions will also work, but lack some functionality). Visit https://www.lcn.eu (opens new window) for updates.
Thing Type ID: pckGateway
| Name | Description | Type | Required |
|---|---|---|---|
hostname | Hostname or IP address of the LCN-PCHK gateway | String | Yes |
port | TCP port of the LCN-PCHK gateway (default:4114) | Integer | Yes |
username | Username configured within LCN-PCHK Monitor | String | Yes |
password | Password configured within LCN-PCHK Monitor | String | Yes |
mode | Dimmer resolution: native50 or native200 See below. | String | Yes |
timeoutMs | Period after which an LCN command is resent, when no acknowledge has been received (in ms) (default: 3500) | Integer | Yes |
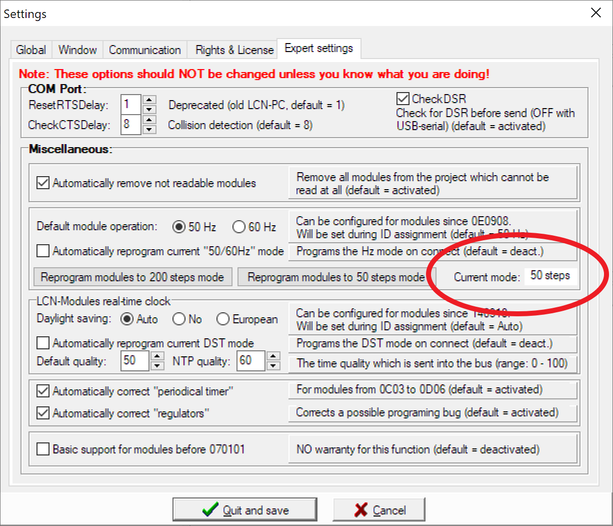
ATTENTION: You must set the correct dimmer output resolution in the PCK Gateway Thing (
mode)! This setting is crucial, and valid for the whole LCN bus.
It is either 0-50 steps or 0-200 steps. It has to be the same as in the parameterizing software LCN-PRO under Options/Settings/Expert Settings.
When using a wrong dimmer output setting, dimming the outputs will result in unintended behavior!
Please see the following LCN-PRO screenshot to determine the dimmer output resolution for the LCN bus:
# Thing: LCN Group
LCN modules can be assigned to groups with the programming software LCN-PRO.
To send commands to an LCN group, the group needs to be added to openHAB as a Thing.
One LCN module within the group is used to represent the status of the whole group. For example, when a Dimmer Output is controlled via a LCN group Thing, openHAB will always visualize the state of the Dimmer Output of the chosen module. The states of the other modules in the group are ignored for visualization.
Thing Type ID: group
| Name | Description | Type | Required |
|---|---|---|---|
groupId | The group number, configured in LCN-PRO | Integer | Yes |
moduleId | The module ID of any module in the group. The state of this module is used for visualization of the group as representative for all modules. | Integer | Yes |
segmentId | The segment ID of all modules in this group (0 if no segments are present) | Integer | Yes |
The groupId must match the previously configured group number in the programming software LCN-PRO.
# Discovery
# Discover LCN Modules
Basic data like the names of all LCN modules in the bus, can be read out by openHAB's discovery function.
If not all LCN modules get listed on the first run, click on the refresh button to start another scan.
When adding a module by discovery, the new Thing's UID will be a combination of segment and module id using the following format:
S<segmentId>M<moduleId> where segmentId and moduleId are formatted as three-digit numbers with leading zeros.
# Discover PCK Gateways
PCK gateways in the LAN can be found automatically by openHAB. This is done by UDP multicast messages on port 4220. The discovery works only if the firewall of the PCK gateway is not configured too strictly. This means on Windows PCs, that the network must be configured as 'private' and not as 'public'. Also, some network switches may block multicast packets. Unfortunately, LCN-PCHK listens only on the first network interface of the computer for discovery packets. If your PCK gateway has multiple network interfaces, LCN-PCHK may listen on the wrong interface and fails to respond to the discovery request.
Discovery has successfully been tested with LCN-PCHK 3.2.2 running on a Raspberry Pi with Raspbian and openHAB running on Windows 10.
If discovery fails, you can add a PCK gateway manually. See Thing: PCK Gateway.
Please be aware that you have to configure username, password and the dimmer output resolution also if you use discovery. See Thing: PCK Gateway.
When adding a PCK gateway by discovery, the new Thing's UID is the MAC address of the device, running the PCK gateway.
# Supported LCN Features and openHAB Channels
The following table lists all features of LCN and their mappings to openHAB Channels.
These Channels are available for the Thing LCN module (module).
LCN group (group) has the same Channels, except status-only Channels like binary sensors or transponders.
The PCK gateway (pckGateway) has no Channels.
Although, there are many Not implemented entries, the vast majority of LCN features can be used with openHAB:
If a special command is needed, the Hit Key action (German: "Sende Tasten") can be used to hit a module's key virtually and execute an arbitrary command.
| LCN Feature (English) | LCN Feature (German) | Channel | IDs | Type | Description |
|---|---|---|---|---|---|
| Dimmer Output Control Single | Ausgang | output | 1-4 | Dimmer, Switch | Sets the dimming value of an output with a given ramp. |
| Relay | Relais | relay | 1-8 | Switch | Controls a relay and visualizes its state. |
| Visualize Binary Sensor | Binärsensor anzeigen | binarysensor | 1-8 | Contact | Visualizes the state of a binary sensor (special channel mapping for some devices). |
| LED Control | LED-Steuerung | led | 1-12 | Text (ON, OFF, BLINK, FLICKER) | Controls an LED and visualizes its current state. |
| Visualize Logic Operations | Logik Funktion anzeigen | logic | 1-4 | Text (NOT, OR, AND) | Visualizes the result of the logic operation. |
| Motor/Shutter on Dimmer Outputs | Motor/Rollladen an Ausgängen | rollershutteroutput | 1-4 | Rollershutter | Control roller shutters on dimmer outputs |
| Motor/Shutter on Relays | Motor/Rollladen an Relais | rollershutterrelay | 1-4 | Rollershutter | Control roller shutters on relays |
| Variables | Variable anzeigen | variable | 1-12 | Number | Sets and visualizes the value of a variable. |
| Regulator Set Setpoint | Regler Sollwert ändern | rvarsetpoint | 1-2 | Number | Sets and visualizes the setpoint of a regulator. |
| Regulator Lock | Regler sperren | rvarlock | 1-2 | Switch | Locks a regulator and visualizes its locking state. |
| Set Thresholds in Register 1 | Schwellwert in Register 1 ändern | thresholdregister1 | 1-4 | Number | Sets and visualizes a threshold in the given threshold register. |
| Set Thresholds in Register 2 | Schwellwert in Register 2 ändern | thresholdregister2 | 1-4 | Number | Sets and visualizes a threshold in the given threshold register. |
| Set Thresholds in Register 3 | Schwellwert in Register 3 ändern | thresholdregister3 | 1-4 | Number | Sets and visualizes a threshold in the given threshold register. |
| Set Thresholds in Register 4 | Schwellwert in Register 4 ändern | thresholdregister4 | 1-4 | Number | Sets and visualizes a threshold in the given threshold register. |
| Visualize S0 Counters | S0-Zähler anzeigen | s0input | 1-4 | Number | Visualizes the value of a S0 counter. |
| Lock Keys Table A | Sperre Tastentabelle A | keylocktablea | 1-8 | Switch | Locks a key on the given key table and visualizes its state. |
| Lock Keys Table B | Sperre Tastentabelle B | keylocktableb | 1-8 | Switch | Locks a key on the given key table and visualizes its state. |
| Lock Keys Table C | Sperre Tastentabelle C | keylocktablec | 1-8 | Switch | Locks a key on the given key table and visualizes its state. |
| Lock Keys Table D | Sperre Tastentabelle D | keylocktabled | 1-8 | Switch | Locks a key on the given key table and visualizes its state. |
| Dimmer Output Flicker | Ausgang: Flackern | N/A | N/A | N/A | Action "flickerOutput": Let a dimmer output flicker for a given count of flashes. |
| Dynamic Text | Dynamischer Text | N/A | N/A | N/A | Action: "sendDynamicText": Sends custom text to an LCN-GTxD display. |
| Send Keys | Sende Tasten | N/A | N/A | N/A | Action: "hitKey": Hits a key of a key table in an LCN module. Can be used to execute commands, not supported by this binding. |
| Dimmer Output Control Multiple | Mehrere Ausgänge steuern | output | 1-4 | Dimmer, Switch | Control multiple outputs simultaneously. See below. |
| Transponder | Transponder | code#transponder | Trigger | Receive transponder messages | |
| Fingerprint | Fingerprint | code#fingerprint | Trigger | Receive fingerprint code messages | |
| Remote Control | Fernbedienung | code#remotecontrolkey | Trigger | Receive commands from remote control | |
| Access Control | Zutrittskontrolle | code#remotecontrolcode | Trigger | Receive serial numbers from remote control | |
| Remote Control Battery Low | Fernbedienung Batterie schwach | code#remotecontrolbatterylow | Trigger | Triggered when the sending remote control has a low battery | |
| Host Command (Send Keys) | Kommando an Host (Sende Tasten) | hostcommand#sendKeys | - | Trigger | Receive send keys command from LCN module |
| Status Message | Statusmeldungen | - | - | - | Automatically done by openHAB Binding |
| Audio Beep | Audio Piepen | - | - | - | Not implemented |
| Audio LCN-MRS | Audio LCN-MRS | - | - | - | Not implemented |
| Count/Compute | Zählen/Rechnen | - | - | - | Not implemented |
| DALI | DALI | - | - | - | Not implemented |
| Dimmer Output Memory Toggle | Ausgang: Memory Taster | - | - | - | Not implemented |
| Dimmer Output Ramp Stop | Ausgang: Rampe Stop | - | - | - | Not implemented |
| Dimmer Output Relative | Ausgang: Relativ | - | - | - | Not implemented |
| Dimmer Output Stairway | Ausgang: Treppenhauslicht | - | - | - | Not implemented |
| Dimmer Output Timer | Ausgang: Timer (Kurzzeit) | - | - | - | Not implemented |
| Display Set Language | Display-Sprache setzen | - | - | - | Not implemented |
| Dynamic Groups | Dynamische Gruppen | - | - | - | Not implemented |
| Free Input | Freie Eingabe | - | - | - | Not implemented |
| LED Brightness | LED-Helligkeit | - | - | - | Not implemented |
| LED Test | LED-Test | - | - | - | Not implemented |
| LED Transform | LED-Umwandlung | - | - | - | Not implemented |
| Light Scenes | Lichtszenen | - | - | - | Not implemented |
| Lock Keys by Time (Table A) | Sperre (Zeit) Tasten (Tabelle A) | - | - | - | Not implemented |
| Lock Outputs by Time | Sperre (Zeit) Ausgänge | - | - | - | Not implemented |
| Lock Relays | Sperre Relais | - | - | - | Not implemented |
| Lock Thresholds | Sperre Schwellwerte | - | - | - | Not implemented |
| Motor Position | Motor Position | - | - | - | Not implemented |
| Relay Timer | Relais-Timer | N/A | N/A | N/A | Action: "startRelayTimer": Starts a relay timer for the given relay number with the given duration in milliseconds. |
| Send Keys Delayed | Sende Tasten verzögert | - | - | - | Not implemented |
| Set S0 Counters | S0-Zähler setzen | - | - | - | Not implemented |
| Status Command | Statuskommandos | - | - | - | Not implemented |
For some Channels a unit should be configured for visualization. By default the native LCN value is used.
S0 counter Channels need to be the pulses per kWh configured. If the value is left blank, a default value of 1000 pulses/kWh is set.
The Rollershutter Channels provide the boolean parameter invertUpDown, which can be set to 'true' if the Up/Down wires are interchanged.
The binary sensor Channels provide the boolean parameter invertState, which can be set to 'true' if the binary sensor connected uses inverted logic for signaling open/closed.
# Transponder/Fingerprints
LCN transponder readers or fingerprint readers can be integrated in openHAB e.g. for access control. The transponder function must be enabled in the module's I-port properties within LCN-PRO.
Example: When the transponder card with the ID "12ABCD" is seen by the reader connected to LCN module "S000M011", the item "M10_Relay7" is switched on:
rule "My Transponder"
when
    Channel "lcn:module:b827ebfea4bb:S000M011:code#transponder" triggered "12ABCD"
then
    M10_Relay7.sendCommand(ON)
end
Example: When fingerprint with ID "AFFE12" is seen by reader connected to LCN module "S000M011", the item "M10_Relay7" is switched on:
rule "My Fingerprint"
when
    Channel "lcn:module:b827ebfea4bb:S000M011:code#fingerprint" triggered "AFFE12"
then
    M10_Relay7.sendCommand(ON)
end
# Command from an LCN Module to openHAB
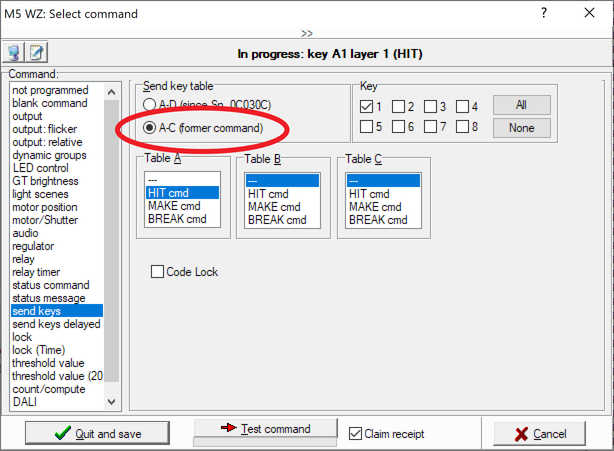
LCN modules can send commands to openHAB, e.g. by pressing a physical LCN key. The command must be programmed into the LCN module by the programming software LCN-PRO. Only the send keys command (German: "Sende Tasten") is supported.
Program a command to a key of an LCN module via LCN-PRO. When LCN-PRO asks you for the target address, don't select any module, but manually enter the PCK host ID, configured within PCHK (default: 4). Select the send keys command and "A-C (former command)", as PCHK 3.2.2 only supports the old command. Then, select any key(s) you want to send to openHAB. These can be freely chosen, as they are only evaluated by openHAB.
The following rule can be used to trigger any action:
rule "Module 12 sent A1 Hit"
when
    Channel "lcn:module:b827ebfea4bb:S000M012:hostcommand#sendKeys" triggered "A1:HIT"
then
    M10_Relay7.sendCommand(ON)
end
A1 is the key of the send keys command, programmed by LCN-PRO.
After the colon, the LCN "hit type" follows: HIT, MAKE or BREAK (German: kurz, lang, los)
If multiple keys or key tables are programmed in a single "send keys" command, multiple triggers will be executed.
Notice: Don't test the command with the "Test command" button in LCN-PRO. This will send a command from LCN-PRO to openHAB, but openHAB expects the module as the sender. Simply press the physical button at the module for testing.
# Remote Control
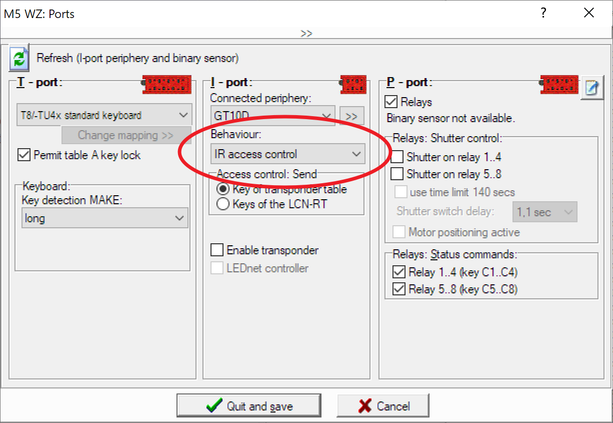
To evaluate commands from LCN remote controls (e.g. LCN-RT or LCN-RT16), the module's I-port behavior must be configured as "IR access control" within LCN-PRO:
# Remote Control Keys
The trigger Channel lcn:module:<pckThing>:<moduleThing>:code#remotecontrolkey can be used to execute commands, when a specific key on a remote control is pressed:
rule "Remote Control Key 3 on Layer 1 hit"
when
    Channel "lcn:module:b827ebfea4bb:S000M012:code#remotecontrolkey" triggered "A3:HIT"
then
    M10_Relay7.sendCommand(ON)
end
A3 is key 3 on the first layer. B1 is key 1 on the second layer etc.. After the colon follows the LCN "hit type" HIT, MAKE or BREAK (German: kurz, lang, los).
# Remote Control used as Access Control
The serial number of a remote control can be used for access control via the channel lcn:module:<pckThing>:<moduleThing>:code#remotecontrolcode. See the following example:
rule "Remote Control Key 3 on Layer 1 hit (only executed for serial number AB1234)"
when
    Channel "lcn:module:b827ebfea4bb:S000M012:code#remotecontrolcode" triggered "AB1234:A3:HIT" or
    Channel "lcn:module:b827ebfea4bb:S000M012:code#remotecontrolcode" triggered "AB1234:A3:MAKE"
then
    M10_Relay7.sendCommand(ON)
end
The command will be executed when the remote control button A3 is either pressed short or long.
# Dimmer Outputs with Ramp and Multiple Outputs
The output profile can be used to control multiple dimmer outputs of the same module simultaneously or control a dimmer output with a ramp (slowly dimming).
The optional ramp parameter must be float or integer. The lowest value is 0.25, which corresponds to 0.25s. The highest value is 486s. When no ramp parameter is specified or no profile is configured, the ramp is 0 (behavior like a switch). The ramp parameter is not available for Color Items.
// Dim output 2 in 0.25s
Switch M10_Output2 {channel="lcn:module:b827ebfea4bb:S000M010:output#2"[profile="lcn:output", ramp=0.25]} // with ramp of 0.25s (smallest value)
// Dim output 3 in 486s
Dimmer M10_Output3 {channel="lcn:module:b827ebfea4bb:S000M010:output#3"[profile="lcn:output", ramp=486]}  // with ramp of 486s (biggest value)
The optional parameters controlAllOutputs and controlOutputs12 can be used to control multiple outputs simultaneously. Please note that the combination of these parameters with the ramp parameter is limited:
// Control outputs 1+2 simultaneously. Status of Output 1 is visualized. Only ramps of 0s or 0.25s are supported.
Dimmer M10_Outputs12a {channel="lcn:module:b827ebfea4bb:S000M010:output#1"[profile="lcn:output", controlOutputs12=true]}
Dimmer M10_Outputs12b {channel="lcn:module:b827ebfea4bb:S000M010:output#1"[profile="lcn:output", controlOutputs12=true, ramp=0.25]}
// Control all outputs simultaneously. Status of Output 1 is visualized.
Dimmer M10_OutputAll1 {channel="lcn:module:b827ebfea4bb:S000M010:output#1"[profile="lcn:output", controlAllOutputs=true, ramp=0]} // ramp only since firmware 180501
Dimmer M10_OutputAll2 {channel="lcn:module:b827ebfea4bb:S000M010:output#1"[profile="lcn:output", controlAllOutputs=true, ramp=0.25]} // ramp compatibility: all
Dimmer M10_OutputAll3 {channel="lcn:module:b827ebfea4bb:S000M010:output#1"[profile="lcn:output", controlAllOutputs=true, ramp=0.5]} // ramp only since firmware 180501
# Actions
Actions are special commands that can be sent to LCN modules or LCN groups.
# Hit Key
This Action virtually hits a key of a key table in an LCN module. Simply spoken, openHAB acts as a push button switch connected to an LCN module.
This Action can be used to execute commands which are not natively supported by this binding. The function can be programmed via the software LCN-PRO onto a key in a module's key table. Then, the programmed key can be "hit" by this Action and the command will be executed.
When programming a "Hit Key" Action, the following parameters need to be set:
table - The module's key table: A, B, C or D
key - The number of the key within the key table: 1-8
action - The key's action: HIT (German: "kurz"), MAKE ("lang") or BREAK ("los")
rule "Hit key C4 hourly"
when
    Time cron "0 0 * * * ?"
then
    val actions = getActions("lcn","lcn:module:b827ebfea4bb:S000M010")
    actions.hitKey("C", 4, "HIT")
end
# Dynamic Text
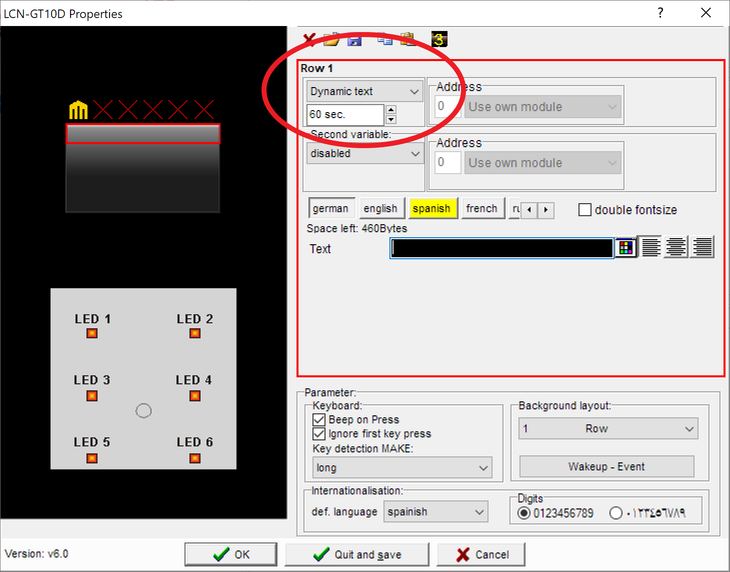
This Action can be used to send custom texts to an LCN-GTxD display. To make this function work, the row of the display has to be configured to allow dynamic text within LCN-PRO:
When programming a "Dynamic Text" Action, the following parameters need to be set:
row - The number of the row in the display: 1-4
text - The text to be displayed (UTF-8)
The length of the text may not exceed 60 bytes of characters. Bear in mind that unicode characters can take more than one byte (e.g. umlauts (äöü) take two bytes).
rule "Send dynamic Text to GT10D hourly"
when
    Time cron "0 0 * * * ?"
then
    val actions = getActions("lcn","lcn:module:b827ebfea4bb:S000M012")
    actions.sendDynamicText(1, "Test 123 CO₂ öäü߀") // row 1
end
# Flicker Output
This Action realizes the LCN command "Output: Flicker" (German: "Ausgang: Flackern"). The command let a dimmer output flash a given number of times. This feature can be used e.g. for alert signals or visual door bells.
When programming a "Flicker Output" Action, the following parameters need to be set:
output - The dimmer output number: 1-4
depth - The depth of the flickering: 0-2 (0=25% 1=50% 2=100% Example: When the output is fully on (100%), and 0 is selected, flashes will dim from 100% to 75% and back)
ramp - The duration/ramp of one flash: 0-2 (0=2sec 1=1sec 2=0.5sec)
count - The number of flashes: 1-15
This action has also effect, if the given output is off. The output will be dimmed from 0% to depth and back, then.
rule "Flicker output 1 when window opens"
when
    Item M10_BinarySensor5 changed to OPEN
then
    val actions = getActions("lcn","lcn:module:b827ebfea4bb:S000M010")
    // output=1, depth=2=100%, ramp=0=2s, count=3
    actions.flickerOutput(1, 2, 0, 3)
end
# Relay Timer
This Action realizes the LCN commmand "Relay Timer" (German: "Relais-Timer"). The command switches the given relay immediately to on and after a given time back to off.
When programming a "Relay Timer" Action, the following parameters need to be set:
relayNumber - The relay number: 1-8
duration - Timer duration in milliseconds: 30-240.000 ms
rule "Start relay timer for led driver when dummy switch changed"
when
    Item Dummy_Switch changed
then
    val actions = getActions("lcn","lcn:module:b827ebfea4bb:17B4196847")
    // relayNumber=3, duration=90
    actions.startRelayTimer(3,90)
end
# Caveat and Limitations
LCN segments are supported by this binding, but could not be tested, due to lack of hardware.
LEDs do not support the OnOffCommand and respectively the Switch Item type, because they have the additional states BLINK and FLICKER. They must be configured as String Item. When used in rules, the parameter must be of type string. Example: M10_LED1.sendCommand("ON"). Note the quotation marks.
# Full Example
Config .things
Bridge lcn:pckGateway:myPCHK [ hostname="192.168.123.123", port=4114, username="myUser", password="myPassword", mode="native200" ] {
	Thing module M99 "M99 MyModule" [ moduleId=99, segmentId=0 ] {
	Channels:
        Rollershutter : rollershutterrelay#1 "My twisted rollershutter relay" [ invertUpDown = true ]
		Contact : binarysensor#6 [ invertState=true ]
		Number  : rvarsetpoint#1 [ unit="temperature" ]
		Number  : variable#3     [ unit="temperature" ]
	}
}
Config .items
// Dimmer Outputs
Dimmer M10_Output1 {channel="lcn:module:b827ebfea4bb:S000M010:output#1"}
Switch M10_Output2 {channel="lcn:module:b827ebfea4bb:S000M010:output#2"[profile="lcn:output", ramp=0.25]} // with ramp of 0.25s (smallest value)
Dimmer M10_Output3 {channel="lcn:module:b827ebfea4bb:S000M010:output#3"[profile="lcn:output", ramp=486]}  // with ramp of 486s (biggest value)

// Dimmer Outputs: Control all simultaneously. Status of Output 1 is visualized.
Dimmer M10_OutputAll1 {channel="lcn:module:b827ebfea4bb:S000M010:output#1"[profile="lcn:output", controlAllOutputs=true, ramp=0]}    // ramp=0: only since firmware 180501
Dimmer M10_OutputAll2 {channel="lcn:module:b827ebfea4bb:S000M010:output#1"[profile="lcn:output", controlAllOutputs=true, ramp=0.25]} // ramp=0.25: compatibility: all firmwares
Dimmer M10_OutputAll3 {channel="lcn:module:b827ebfea4bb:S000M010:output#1"[profile="lcn:output", controlAllOutputs=true, ramp=0.5]}  // ramp>=0.5: only since firmware 180501

// Dimmer Outputs: Control outputs 1+2 simultaneously. Status of Output 1 is visualized. Only ramps of 0s or 0.25s are supported.
Dimmer M10_Outputs12b {channel="lcn:module:b827ebfea4bb:S000M010:output#1"[profile="lcn:output", controlOutputs12=true, ramp=0.25]}

// Dimmer Outputs: RGB Control
Color M10_Color {channel="lcn:module:b827ebfea4bb:S000M010:output#color"[profile="lcn:output"]}

// Roller Shutter on Output 1+2
Rollershutter M10_RollershutterOutput1 {channel="lcn:module:b827ebfea4bb:S000M010:rollershutteroutput#1"}

// Relays
Switch M10_Relay1 {channel="lcn:module:b827ebfea4bb:S000M010:relay#1"}

// Roller Shutter on Relays 1+2
Rollershutter M10_RollershutterRelay1 {channel="lcn:module:b827ebfea4bb:S000M010:rollershutterrelay#1"}

// LEDs
String M10_LED1 {channel="lcn:module:b827ebfea4bb:S000M010:led#1"}
String M10_LED2 {channel="lcn:module:b827ebfea4bb:S000M010:led#2"}

// Logic Operations (legacy name: "Sums")
String M10_Logic1 {channel="lcn:module:b827ebfea4bb:S000M010:logic#1"}
String M10_Logic2 {channel="lcn:module:b827ebfea4bb:S000M010:logic#2"[profile="transform:MAP", function="alertSystem.map"]}
// conf/transform/alertSystem.map:
// NOT=All windows are closed
// OR=Some windows are open
// AND=All windows are open

// Binary Sensors (Channels 1-3 of LCN-B3I are mapped to BinarySensor6, BinarySensor7, BinarySensor8)
Contact M10_BinarySensor1 {channel="lcn:module:b827ebfea4bb:S000M010:binarysensor#1"}

// Variables
// The units of the variables must also be set in the Channels configuration, to be visualized correctly.
Number:Temperature M10_Variable1 "[%.1f %unit%]" <temperature> {channel="lcn:module:b827ebfea4bb:S000M010:variable#1"} // Temperature in °C
Number:Temperature M10_Variable2 "[%.1f °F]" <temperature> {channel="lcn:module:b827ebfea4bb:S000M010:variable#2"} // Temperature in °F
Number M10_Variable3 "[%d ppm]" <temperature> {channel="lcn:module:b827ebfea4bb:S000M010:variable#3"}              // Indoor air quality in ppm
Number M10_Variable4 "[%d lx]"    {channel="lcn:module:b827ebfea4bb:S000M010:variable#4"}                          // Illuminance in Lux
Number:Illuminance M10_Variable5 "[%.1f klx]" {channel="lcn:module:b827ebfea4bb:S000M010:variable#5"}              // Illuminance in kLux
Number M10_Variable6 "[%.1f mA]"  {channel="lcn:module:b827ebfea4bb:S000M010:variable#6"}                          // Electrical current in mA
Number M10_Variable7 "[%.1f V]"   {channel="lcn:module:b827ebfea4bb:S000M010:variable#7"}                          // Voltage in V
Number M10_Variable8 "[%.1f m/s]" {channel="lcn:module:b827ebfea4bb:S000M010:variable#8"}                          // Wind speed in m/s
Number M10_Variable9 "[%.1f °]"  {channel="lcn:module:b827ebfea4bb:S000M010:variable#9"}                           // position of the sun (azimuth or elevation) in °
Number M10_Variable10 "[%d W]"    {channel="lcn:module:b827ebfea4bb:S000M010:variable#10"}                         // Current power of an S0 input in W
Number:Power M10_Variable11 "[%.1f kW]" {channel="lcn:module:b827ebfea4bb:S000M010:variable#11"}                   // Current power of an S0 input in kW

// Regulators
Number:Temperature M10_R1VarSetpoint "[%.1f %unit%]" <temperature> {channel="lcn:module:b827ebfea4bb:S000M010:rvarsetpoint#1"} // Temperature in °C
Switch M10_R1VarLock {channel="lcn:module:b827ebfea4bb:S000M010:rvarlock#1"} // Lock state of R1Var

// Thresholds
Number:Temperature M10_ThresholdRegister1_Threshold1 "[%.1f %unit%]" {channel="lcn:module:b827ebfea4bb:S000M010:thresholdregister1#1"} // Temperature in °C
Number:Temperature M10_ThresholdRegister4_Threshold2 "[%.1f %unit%]" {channel="lcn:module:b827ebfea4bb:S000M010:thresholdregister4#2"} // Temperature in °C

// S0 Counters
Number:Energy M10_S0Counter1 "[%.1f kWh]" {channel="lcn:module:b827ebfea4bb:S000M010:s0input#1"}

// Key Locks
Switch M10_KeyLockA1 {channel="lcn:module:b827ebfea4bb:S000M010:keylocktablea#1"}
Switch M10_KeyLockD5 {channel="lcn:module:b827ebfea4bb:S000M010:keylocktabled#5"}
Config .sitemap
sitemap lcn label="My home automation" {
    Frame label="Demo Items" {
        // Dimmer Outputs
        Default item=M10_Output1 label="Output 1"
        Default item=M10_Output2 label="Output 2"
        Default item=M10_Output3 label="Output 3"

        // Dimmer Outputs: Control all simultaneously. Status of Output 1 is visualized.
        Default item=M10_OutputAll1 label="All Outputs ramp=0 since firmware 180501"
        Default item=M10_OutputAll2 label="All Outputs ramp=250ms all firmwares"
        Default item=M10_OutputAll3 label="All Outputs ramp>=500ms since firmware 180501"

        // Dimmer Outputs: Control outputs 1+2 simultaneously. Status of Output 1 is visualized. Only ramps of 0s or 0.25s are supported.
        Default item=M10_Outputs12a label="Outputs 1+2 Ramp=0"
        Default item=M10_Outputs12b label="Outputs 1+2 Ramp=0.25s"

        // Dimmer Outputs: RGB Control
        Colorpicker item=M10_Color

        // Roller Shutter on Outputs 1+2
        Default item=M10_RollershutterOutput1 label="Roller Shutter on Output 1+2"

        // Relays
        Default item=M10_Relay1 label="Relay 1"

        // Roller Shutter on Relays
        Default item=M10_RollershutterRelay1 label="Roller Shutter on Relay 1-2"

        // LEDs
        Switch item=M10_LED1 label="LED 1" mappings=[ON=ON, OFF=OFF] // Don't display "Blink" or "Flicker"
        Switch item=M10_LED2 label="LED 2"

        // Logic Operations (legacy name: "Sums")
        Default item=M10_Logic1 label="Logic Operation 1"
        Default item=M10_Logic2 label="Logic Operation 2"

        // Binary Sensors (Channels 1-3 of LCN-B3I are mapped to BinarySensor6, BinarySensor7, BinarySensor8)
        Default item=M10_BinarySensor1 label="Binary Sensor 1"

        // Variables
        Setpoint item=M10_Variable1 label="Variable 1"
        Default item=M10_Variable2 label="Variable 2"
        Default item=M10_Variable3 label="Variable 3"
        Default item=M10_Variable4 label="Variable 4"
        Default item=M10_Variable5 label="Variable 5"
        Default item=M10_Variable6 label="Variable 6"
        Default item=M10_Variable7 label="Variable 7"
        Default item=M10_Variable8 label="Variable 8"
        Default item=M10_Variable9 label="Variable 9"
        Default item=M10_Variable10 label="Variable 10"
        Default item=M10_Variable11 label="Variable 11"

        // Regulators
        Setpoint item=M10_R1VarSetpoint label="R1Var Setpoint" step=1 minValue=-10.0
        Default item=M10_R1VarLock label="R1Var Lock"  // Lock state of R1Var

        // Thresholds
        Setpoint item=M10_ThresholdRegister1_Threshold1 label="Threshold Register 1 Threshold 1"
        Setpoint item=M10_ThresholdRegister4_Threshold2 label="Threshold Register 4 Threshold 2"

        // S0 Counters
        Default item=M10_S0Counter1 label="S0 Counter 1"

        // Key Locks
        Default item=M10_KeyLockA1 label="Locked State Key A1"
        Default item=M10_KeyLockD5 label="Locked State Key D5"
    }
}
← LaMetric Leap Motion →